Low Taper Fade: Barber’s Complete Guide + Exact Scripts (2025)
After cutting over 10,000 low taper fades in my 15 years behind the chair, I can tell you this: the low taper fade isn’t just surviving in 2025, it’s dominating. Walk into any barbershop from Brooklyn to Los Angeles, and you’ll hear “low taper” requested more than any other cut. There’s a reason this style has stayed relevant while other trends came and vanished.
The low taper fade starts just above your ears and gradually shortens into your natural hairline, creating a clean transition that’s professional enough for boardrooms and sharp enough for everywhere else. Unlike high fades that scream for attention or mid fades that sit awkwardly between subtle and bold, the low taper hits the sweet spot.
TL;DR: Essential Takeaways
- Perfect for: All face shapes, hair types, and professional environments
- Maintenance: Touch-ups every 2-3 weeks for crisp lines
- Cost: $25-60 depending on location and barber experience
- Unique advantage: Grows out gracefully, unlike skin fades that show regrowth immediately
- 2025 trend: Still the #1 requested men’s haircut with no signs of slowing
What Exactly Is a Low Taper Fade?
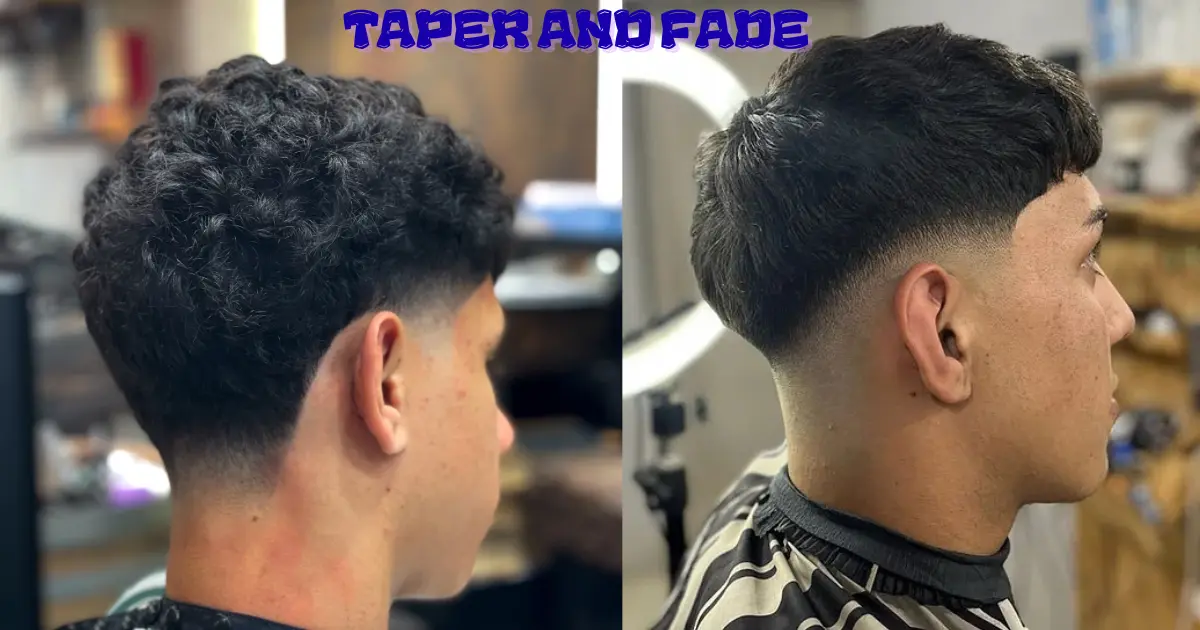
A low taper fade is a haircut where your hair gradually shortens around your sideburns and nape, starting just above your ears. The fade stays low on your head, keeping more weight above the parietal ridge while creating a smooth blend into longer hair on top.
Think of it like a volume dial that turns down slowly instead of cutting off abruptly. The “low” placement means the shortest point sits near your natural hairline, about half an inch above your ear. The “taper” describes how the length reduces gradually. The “fade” means it eventually blends into skin or near-skin length.
This combination creates a refined look that reads as intentional grooming rather than dramatic styling. Your hair maintains its natural shape while the edges get defined and tightened. The result looks sharp on Monday and still presentable by Friday, unlike higher fades that announce their age within days.
Why This Cut Dominates 2025 Barbershops
The low taper fade hit critical mass around 2015 and never left. Recent data shows it accounts for roughly 40% of all fade requests in major US cities. Social media amplified its reach, particularly TikTok’s low taper fade meme trend in 2023, which brought the style to younger audiences who might have overlooked classic barbering.
What keeps it relevant isn’t hype, though. It’s versatility. Bankers wear it to work. Athletes rock it on game day. Students get it before school starts. The cut adapts to your life rather than demanding you adapt to it. Add volume on top for weekend styling, or keep it tight and corporate for Monday morning presentations.
The technical execution also improved dramatically over the past decade. Modern clippers, better blending guards, and widespread barber education through platforms like YouTube and Instagram raised the baseline skill level. Finding a barber who can execute a clean low taper is easier now than ever before.
Low Taper vs Other Fades: Know the Difference
Confusion around fade terminology wastes time and creates disappointing haircuts. Let me break down exactly what separates each style so you can communicate clearly with your barber.
Low Taper Fade starts just above your ears, typically 0.5 to 1 inch up. The blend happens within a tight zone, maybe 1-2 inches total. Hair on your sides stays relatively full compared to other fades. The contrast is subtle. When it grows out, the shape holds longer than aggressive fades.
Mid Taper Fade begins around temple height, creating more visible contrast between your top and sides. The fade zone extends higher, usually 2-3 inches. This version makes a stronger statement while remaining versatile. If low taper feels too conservative, mid taper adds edge without going extreme.
High Taper Fade starts above your temples, sometimes at the parietal ridge or higher. Maximum contrast. The sides can look nearly bald while the top stays full. This works great for showing off textured tops or making bold style statements. Maintenance becomes more frequent since regrowth is obvious quickly.
Skin Fade (also called bald fade) takes any fade height down to bare skin using a straight razor or foil trimmer. You can get a low skin fade, mid skin fade, or high skin fade. The skin component refers to the shortest point, not the starting height. Skin fades create dramatic contrast but demand weekly touch-ups to stay fresh.
Drop Fade curves down behind your ear rather than following a straight horizontal line. This creates a rounded shape that can soften angular faces. Drop fades pair well with longer tops and natural textures. The curve adds visual interest and helps the fade follow your head’s natural contours.
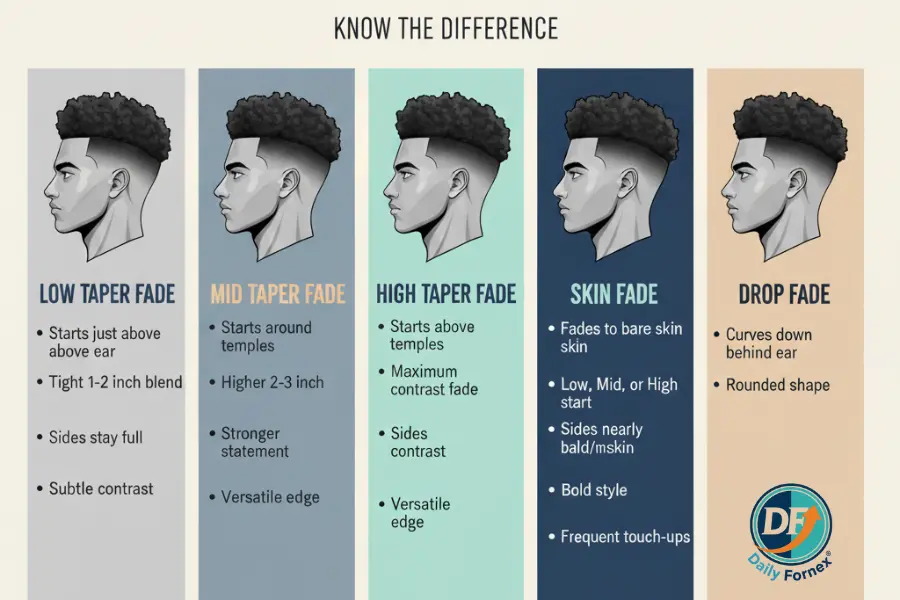
The key distinction: taper describes the gradual reduction in length, fade describes blending into skin or near-skin, and low/mid/high indicates where the fade starts on your head.
Who Should Get a Low Taper Fade?
Short answer: almost everyone. Long answer: here’s who benefits most.
Hair Types That Excel
Straight Hair – The low taper creates razor-sharp definition on straight texture. Lines stay crisp for weeks. You can slick it back, part it to the side, or leave it textured on top. Straight hair shows the gradual fade perfectly, making the technical work obvious without trying. Use pomade for shine or matte clay for texture.
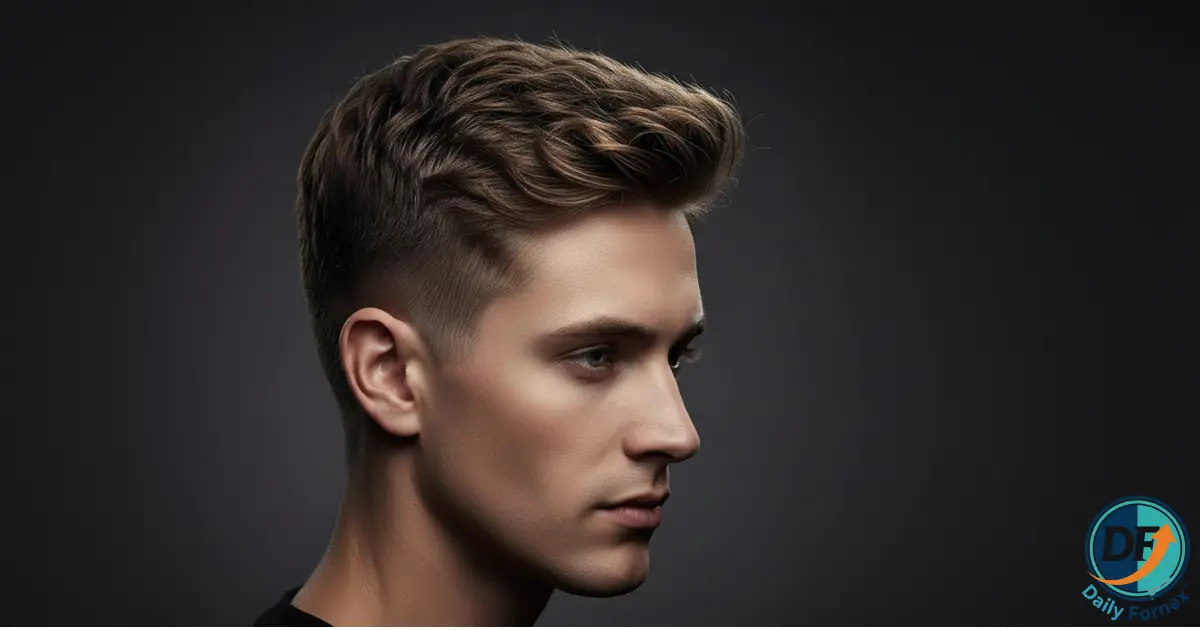
Wavy Hair – Natural movement on top pairs beautifully with clean tapered sides. The waves add personality while the fade provides structure. You don’t need much product, maybe some sea salt spray or light cream to enhance the natural pattern. The contrast between flowing waves and tight sides creates balance.
Curly Hair – This is where low taper fades really shine. The fade controls your outline while letting curls do their thing on top. No more mushroom shape or awkward bulk around your ears. Keep 2-3 inches minimum on top for curl definition. Use curl cream and consider a diffuser when drying. The taper frames your curls without fighting them.
Coily/Kinky Hair – Perfect for shape-ups and line-ups. The low taper creates clean edges while maintaining enough length to avoid scalp irritation from too-tight cutting. Afro tops, twists, locs, and sponge finishes all pair naturally with low tapered sides. Moisture is critical, so use leave-in conditioners and oils regularly.
Face Shapes and Strategic Styling
Oval Face – You win the genetic lottery. Nearly every style works. Keep proportions balanced and you’re golden. The low taper maintains your natural symmetry while adding polish. Style the top however you want, length anywhere from 1 to 6 inches depending on your preference.
Round Face – Add height on top to create the illusion of length. Avoid heavy bulk on the sides that widens your face further. The low taper is perfect here because it removes weight around your ears while keeping things professional. Quiffs, pompadours, and textured volume work great. Keep your sideburns clean and sharp.
Square Face – Your strong jawline already makes a statement. The low taper complements without competing. You can go bolder with your top since your facial structure handles it. Textured crops, side parts, and slick backs all work. If you wear a beard, fade it softly into the taper for seamless transitions.
Heart/Diamond Face – Keep some volume around your temples to balance a narrower lower face. Don’t go too high with the fade or you’ll emphasize the width difference. The low taper is ideal because it maintains fullness where you need it. Leave 2-3 inches on top minimum, styled with some lift at the crown.
Long/Rectangular Face – Avoid excessive height on top, which makes your face look longer. The low taper works because it doesn’t pull attention upward dramatically. Keep your top between 1-3 inches, styled with more horizontal volume than vertical. Consider some fringe or forward movement to break up the length.
Lifestyle Compatibility
Corporate/Professional – The low taper sits firmly in “appropriate for work” territory. It reads as well-groomed without appearing trendy or distracting. If your office is conservative, keep the top between 1-3 inches and style it neatly. This cut has gotten people through job interviews, client presentations, and promotion reviews for decades.
Active/Athletic – Low maintenance and sweat-friendly. The short sides dry quickly after workouts. Throw on a hat without messing up your style. Touch-ups every 3 weeks instead of weekly. If you’re hitting the gym 5 days a week, this cut won’t slow you down or demand constant attention.
Creative/Casual – The low taper provides clean structure you can build on. Add designs, pair it with bold colors, grow the top long for man buns, or keep it textured and messy. The versatility means you can shift between polished and edgy depending on what you’re doing that day.
How to Ask Your Barber: The Exact Script That Works
Walking into a barbershop and saying “give me a fade” will get you a fade, but probably not the one you pictured. Barbers aren’t mind readers. They need specific information to execute what you want.
Here’s the script I teach first-time low taper clients. Copy this, modify it to your preferences, and save it in your phone:
“I want a low taper fade. Start the fade just above my ears, keep it low and tight. Use a #0 or skin at the very edge, blend into #1 within about an inch, then connect to #3 on my sides. Don’t take the fade high above my parietal ridge. For the top, leave [X inches/cm] and add [texture/side part/slick back/natural curl definition/specific style]. Neckline: [natural/rounded/boxed]. If I wear a beard, blend it softly into the taper.”
Let me break down why each part matters:
“Low taper fade” – Clear primary instruction. No ambiguity.
“Start just above my ears” – Defines the fade height precisely. Some barbers interpret “low” differently. This removes guesswork.
“Keep it low and tight” – Reinforces that you don’t want the fade climbing high on your sides.
“#0 or skin at the edge” – Specifies your shortest point. If you want more length, say #0.5 or #1 instead.
“Blend into #1 within about an inch” – Describes the gradient tightness. This creates that subtle, refined look. If you want more contrast, increase this to 2 inches.
“Connect to #3 on my sides” – Tells them what length to maintain above the fade zone. Adjust based on your preference (#2 for tighter, #4 for fuller).
“Don’t take the fade high” – Final reinforcement of placement. Prevents creep into mid-fade territory.
Top length and style – Be specific. “2 inches, textured with matte clay” beats “just clean it up.”
Neckline shape – Natural grows out best and looks most subtle. Rounded works for most head shapes. Boxed suits square jaws but requires more maintenance.
Beard integration – If you have facial hair, mention it. A disconnected beard and fade look unfinished. A soft blend ties everything together.
Bring Reference Photos
Words help. Pictures guarantee results. Save 2-3 images on your phone showing:
- Side view clearly showing fade height
- Back view showing neckline
- Front view showing top style
Show your barber multiple angles. Pointing at one Instagram photo and saying “like this” leaves too much interpretation. Three photos from different angles tells the complete story.
What Not to Say
“Just give me what you think looks good” – You’re hiring an artist, but you’re also the client. Provide direction.
“The usual” – Only works if you’ve seen this specific barber multiple times recently. New barbers don’t know your history.
“Not too short” – Vague and unhelpful. Specify guard numbers or measurements.
“Like that guy over there” – You have different hair texture, density, and growth patterns. Style inspiration is fine, but understand your result will vary.
Step-by-Step: What Happens in the Chair
Understanding the process helps you spot good technique and communicate better during the cut.
1. Consultation (2-3 minutes) – Good barbers ask questions before touching clippers. They assess your hair texture, growth patterns, previous cuts, and desired outcome. This is where you deliver your script. They might suggest modifications based on your hair type or face shape.
2. Sectioning and Initial Clipper Work (3-5 minutes) – Your barber establishes the bulk length on your sides, typically using a #3 or #4 guard. This sets the foundation everything else blends into. They’ll clip around your entire head at this guard size, staying above the fade zone.
3. Creating the Fade Guideline (2-3 minutes) – Using a shorter guard (#1 or #2), they create a guideline where the fade begins. This line sits just above your ears and around your nape. It should be symmetrical on both sides. This is your reference point for the entire fade.
4. Blending the Gradient (5-8 minutes) – This is where skill matters most. Using multiple guard sizes, lever positions, and techniques like flicking or scooping, they gradually blend from your shortest length upward into your side length. Professional barbers use 4-6 different cutting lengths to create seamless transitions.
Watch for: Smooth, continuous motion. No harsh lines or visible demarcations between lengths. They should work in multiple passes, refining the blend each time.
5. Detail Work (2-4 minutes) – Trimmer work around the edges. Your sideburns get lined up. The nape gets cleaned. Hair around your ears gets removed. This creates the sharp, defined look that makes fresh cuts pop.
6. Top Section (3-7 minutes) – Depending on your desired style, this could be quick scissor work to remove length, point cutting for texture, or detailed layering. Communicate clearly here. If they’re taking too much off, speak up immediately.
7. Final Shaping and Lineup (2-3 minutes) – Last pass around your hairline with a trimmer or straight razor. Your barber steps back, checks for symmetry, makes any final adjustments. This is where you should see them checking your head from multiple angles.
8. Product and Styling (1-2 minutes) – Quick styling to show you how it should look. Watch what product they use and how they apply it. Ask questions. A good barber wants you to replicate the look at home.
Total time: 20-35 minutes depending on hair density, desired detail, and barber speed. If someone finishes your low taper in under 15 minutes, be suspicious unless they’re exceptionally skilled or you have very simple hair.
Styling Your Low Taper Fade for Different Looks
The versatility of this cut comes from how you style the top. The sides are locked in, clean and structured. Your top is the variable that changes your entire vibe.
Professional/Corporate
Goal: Neat, controlled, appropriate for serious environments
Product: Medium-hold pomade with shine, or styling cream for natural finish
Method: Apply pomade to damp hair. Comb into a side part using a fine-tooth comb. Blow-dry on low heat while combing in the same direction. Keep volume controlled and proportions even.
Top length: 1.5-3 inches works best for this style
Works with: All hair types, though straight hair shows the cleanest lines
Casual/Textured
Goal: Effortless, natural, touchable
Product: Matte clay or texture paste
Method: Apply product to dry or slightly damp hair. Work through with fingers, creating separation and piece-y texture. Scrunch curly or wavy hair to enhance natural pattern. Let it settle naturally rather than forcing structure.
Top length: 2-4 inches gives you enough to create texture
Works with: Especially good for wavy and curly hair types
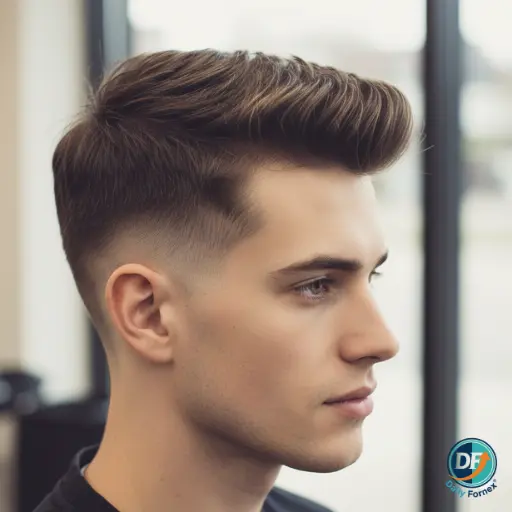
Slicked Back
Goal: Bold, confident, old-school cool with modern edges
Product: Strong-hold pomade or styling gel
Method: Apply generous product to damp hair, distribute evenly. Comb straight back using firm strokes. You can blow-dry while combing back for extra hold and volume. This style works best with at least 3 inches on top.
Top length: 3-6 inches minimum
Works with: Straight and wavy hair. Curly hair needs more product and patience.
Natural Curls/Afro
Goal: Defined, healthy curls with clean structure
Product: Curl cream, leave-in conditioner, light oil for moisture
Method: Apply product to wet hair. Scrunch or finger-coil individual curl sections. Diffuse on low heat or air dry. The low taper frames your curls while keeping the silhouette intentional.
Top length: 2-5 inches depending on desired volume
Works with: Naturally curly, coily, and kinky textures
Textured Crop
Goal: Modern, European-inspired, forward-facing style
Product: Lightweight clay or cream
Method: Apply to damp hair. Push forward and slightly to one side. Create texture by pulling small sections upward. Let the front fall naturally or push it to the side. Keep it loose and movable.
Top length: 2-3 inches, longer in front
Works with: Straight and wavy hair especially, but adaptable for curly
Product Recommendations by Hair Type
Generic “use pomade” advice helps nobody. Here’s what actually works based on hair texture and desired outcome.
For Straight, Fine Hair
Challenge: Lacks natural volume, can look flat or greasy easily
Pre-styler: Sea salt spray or volumizing mousse applied to damp hair before blow-drying
Finisher: Matte clay or lightweight paste for texture without weight
Avoid: Heavy pomades, oils, anything that adds shine and weight
Application tip: Apply product to roots first for lift, then work through lengths
For Straight, Thick Hair
Challenge: Too much weight, can look bulky
Pre-styler: Often unnecessary unless you want heat protection for blow-drying
Finisher: Medium to strong-hold clay, paste, or pomade depending on desired look
Avoid: Nothing really, thick straight hair handles most products well
Application tip: Emulsify product thoroughly in your hands before applying. Distribute evenly to avoid clumping.
For Wavy Hair
Challenge: Can frizz easily, needs definition without crunch
Pre-styler: Light cream or sea salt spray to enhance natural wave pattern
Finisher: Cream-based products or lightweight pomades that provide hold without stiffness
Avoid: Gels that create crunchy texture, heavy waxes that weigh down waves
Application tip: Scrunch product through with fingers while hair is still damp
For Curly Hair
Challenge: Needs moisture and definition without frizz
Pre-styler: Leave-in conditioner is non-negotiable. Curl cream for definition.
Finisher: Light gel or mousse if you need hold. Oil to seal moisture and add shine.
Avoid: Products with alcohol that dry out curls, anything that creates flaking
Application tip: Apply to soaking wet hair, scrunch, then diffuse or air dry. Don’t touch while drying.
For Coily/Kinky Hair
Challenge: Moisture retention, preventing dryness and breakage
Pre-styler: Leave-in conditioner, natural oils (coconut, jojoba, argan)
Finisher: Butters or heavy creams for twist-outs and defined styles. Light oils for shine.
Avoid: Harsh alcohols, sulfates, anything stripping
Application tip: Work product through sections methodically. Moisture and patience create the best results.
General Product Wisdom
Quality matters: Professional products last longer and perform better than drugstore options. You use less per application, so the higher upfront cost evens out.
Less is more: Start with a dime-sized amount. You can always add more. Removing excess product is messy and wasteful.
Damp vs dry application: Creams and gels work best in damp hair for even distribution. Clays and pastes perform better in dry hair for maximum texture.
Wash your hands: Residual product on your hands after styling shouldn’t go to waste. Run them through the sides and back of your hair to condition those shorter sections.
Maintenance: Keeping Your Fade Fresh
A low taper fade looks sharpest for about one week. It looks good for two to three weeks. After that, you’re working with a grown-out taper that needs professional attention.
The Week-by-Week Reality
Days 1-7: Peak freshness. Lines are crisp, blend is tight, everything looks intentional. Style as usual. Wash every 2-3 days to maintain scalp health without stripping natural oils. This is your premium window.
Days 8-14: Still looking good but regrowth becomes visible, especially around your ears and nape. The fade starts softening. You can extend this window with minor home maintenance (covered below) or push through to week three if your schedule is packed.
Days 15-21: The fade has definitely grown out. It still looks clean enough for most settings, but you’re past “fresh” territory. The tapered effect is fading. This is your deadline if you want to maintain low taper fade style consistently.
Days 22+: At this point, you’re sporting a grown-out taper. It’s no longer a low taper fade, it’s just longer hair. Book that appointment.
Home Maintenance Between Cuts
You can extend your fade’s lifespan with careful touch-ups. Emphasis on careful. Bad home maintenance looks worse than controlled growth.
What you’ll need:
- Adjustable clippers or trimmers
- #1 and #2 guard attachments minimum
- Handheld mirror for back visibility
- Good bathroom lighting
- Realistic expectations
What to touch up: Only the very bottom edges. Your sideburn tips, the lowest part of your nape, the area immediately around your ears.
What NOT to touch: The fade blend itself. Don’t try to recreate the gradient. Don’t chase the fade line higher. One mistake and you’ll create a visible step that needs professional fixing.
Safe technique:
- Use a #1 guard on the very bottom edge of your nape, staying below your fade line by at least an inch
- Clean up your sideburn tips with a trimmer (no guard)
- Remove any hair growing over your ears using trimmer or scissors
- Check symmetry constantly using your mirrors
- Stop before you think you should
This adds 3-5 days to your fresh look. If you don’t feel confident, skip it. Growth is better than self-inflicted line disasters.
Scalp and Hair Care
Washing frequency: Every 2-3 days unless you work out heavily or have particularly oily scalp. Daily washing strips natural oils and can lead to dry, flaky skin around your fade.
Product choice: Gentle, sulfate-free shampoo. Your fade area has shorter hair that gets less natural oil distribution. Harsh shampoos dry out your scalp and make irritation worse.
Conditioning: Yes, even on short hair. A light conditioner prevents dryness. Focus on your top section primarily, but run it through the sides briefly.
Moisturizing: Especially important for Black men and anyone with naturally dry scalp. Light oils or lotions keep skin healthy and prevent ashy appearance. Apply after showering while skin is still slightly damp.
Night routine: If you have textured or curly top, sleep on a satin or silk pillowcase. Cotton creates friction that causes frizz and disrupts your style. Some guys use durags or bonnets to maintain waves or protect styles overnight.
Common Maintenance Mistakes
Waiting too long between cuts – By week four, your “maintenance trim” becomes a full rework. You pay the same but spend more time in the chair fixing completely grown-out hair.
Over-washing – Stripping natural oils daily creates dry, irritated scalp and dull hair. This makes your fade look less healthy even when the cut itself is fresh.
Using the wrong products – Heavy oils on the fade area clog pores and cause breakouts. Wrong product weight makes your top look greasy or lifeless.
Sleeping on cotton – If you have texture, cotton pillowcases destroy your style overnight and create unnecessary friction damage.
Attempting complex home cuts – Every barber has fixed disasters from guys who “just wanted to clean it up” between appointments. Know your limits.
Ignoring scalp health – Razor bumps, ingrown hairs, and irritation look worse than slightly grown-out hair. If you’re prone to these issues, communicate with your barber about adjusting technique or fade height.
Common Mistakes to Avoid
Even when you know what you want, execution errors create disappointing results. Here’s what goes wrong most often and how to prevent it.
Communication Failures
Vague instructions: “Just a little off the sides” means different things to different barbers. Use specific measurements and guard numbers. If you say “not too short” without defining “too short,” you’re gambling.
Assuming your barber remembers – Unless you see the same barber every 2-3 weeks consistently, don’t assume they remember your exact preferences from months ago. Re-explain each time or keep notes in your phone.
Not speaking up during the cut: If you notice something going wrong, speak immediately. Waiting until the end creates bigger problems. A professional barber would rather adjust mid-cut than complete something you’re unhappy with.
Style Mismatches
Choosing the wrong fade height for your hair type: Very tight, kinky textures sometimes struggle with super-low fades that require skin-level cutting, which can cause irritation. Listen when your barber suggests slight modifications.
Ignoring face shape: A low taper works universally, but your top style matters. If you have a round face and insist on keeping bulk on the sides, you’re fighting against your natural proportions.
Copying styles without considering hair texture: That Instagram model’s slicked-back low taper looks different on their straight, thick hair than it will on your fine or curly texture. Use inspiration as a starting point, not a blueprint.
Lifestyle Conflicts
High-maintenance styles with low-maintenance schedules: If you travel constantly or skip barber appointments, don’t get line work or crisp designs that look obviously grown-out within days. Stick to simple, clean fades that age gracefully.
Work environment mismatch: Bold designs and dramatic contrasts might clash with conservative workplace dress codes. Know your environment’s expectations before committing to edgier variations.
Activity level vs style demands: If you hit the gym twice daily and shower constantly, heavily styled looks won’t survive. Choose wash-and-go options that handle moisture and movement.
Product and Styling Errors
Too much product: Creates buildup, looks greasy, and highlights regrowth. Start with less than you think you need.
Wrong product type: Gel on curly hair creates crunch. Heavy pomade on fine hair looks flat and greasy. Match products to your hair texture and desired outcome.
Skipping heat protectant: If you blow-dry daily, heat protectant prevents damage that makes your hair look unhealthy regardless of how fresh your cut is.
Aggressive brushing: Too-hard brushing, especially on wet hair, causes breakage. Use appropriate brushes for your texture and be gentle.
Low Taper Fade Variations for Different Styles
The classic low taper provides the foundation, but variations let you customize for personal style or specific aesthetics.
Low Taper with Textured Crop
Modern European influence. The top is cut to 2-3 inches with forward-facing texture. The front has slightly more length that falls toward your forehead. Messy, piece-y, and effortlessly cool.
Best for: Straight and wavy hair, guys aged 18-35, casual to smart-casual environments
Styling: Matte clay through damp hair, pushed forward and slightly to the side. Let it fall naturally without overworking it.
Low Taper with Side Part
Timeless professional look. A defined part line separates your hair, usually on the left or right about 1-2 inches from center. Hair is combed or brushed to opposite sides from the part.
Best for: All hair types, corporate environments, guys who want classic style that’s never out of place
Styling: Apply pomade to damp hair, create part with comb, blow-dry while maintaining the part direction.
Low Taper with Curly Top
The fade controls your outline while your natural curls provide texture and personality on top. Works with loose waves up through tight coils.
Best for: Naturally curly, wavy, and coily hair types
Styling: Curl cream and leave-in conditioner. Scrunch or finger-coil. Diffuse on low heat or air dry. Don’t touch while drying.
Low Taper with Afro/Natural Texture
Clean fade around the perimeter, full natural texture on top. Can be rounded, picked out high, or shaped into specific silhouettes.
Best for: Coily and kinky hair textures, anyone embracing natural hair
Styling: Moisture is everything. Leave-in conditioner, natural oils. Pick or comb to desired shape and height. Regular edge maintenance keeps it looking intentional.
Low Taper Mullet
Modern interpretation of the classic mullet. Low taper on the sides, length left at the back, textured or flowing top. More refined than ’80s versions.
Best for: Guys comfortable with attention, creative environments, those who want something different
Styling: Varies by top texture. The back usually stays natural or slightly textured. The low taper provides the modern update that makes this work.
Low Taper with Fringe
Forward-facing fringe, anywhere from short and textured to longer and swooped. The low taper keeps sides clean while the fringe makes a statement.
Best for: Straight and wavy hair, younger demographic (16-30), fashion-forward style
Styling: Blow-dry the fringe forward with texture spray. Apply light paste or cream to create separation.
Low Taper with Design/Line Work
Clean low taper serves as canvas for shaved designs. Lines, geometric patterns, logos, or freehand artwork get added to the fade zone.
Best for: Anyone wanting personalization, bold style, younger demographic though adults rock it too
Maintenance: Designs blur quickly as hair grows. Plan for 1-2 week maximum freshness. Regular touch-ups necessary.
Low Taper with Beard Fade
The taper on your head blends seamlessly into your beard, creating one continuous fade from your top hair down through your facial hair to your neck.
Best for: Guys with full beards, those who want cohesive grooming, mature demographic (25+)
Execution: Requires skilled barber familiar with beard fading. The transition should be soft and gradual, not obvious.
Cost Considerations and Value
Low taper fades range from $20 to $60+ depending on several factors. Understanding what drives price helps you find the right balance of quality and budget.
Price Factors
Location: Major metro areas (NYC, LA, San Francisco, Chicago) average $40-60. Suburban and rural areas typically $25-40. Small towns sometimes $20-30.
Barber experience: Entry-level barbers charge less. 5+ years experience commands premium pricing. 10+ years and strong reputation can hit $60-80 for the same technical cut.
Shop type: Chain barbershops (Sport Clips, Supercuts) run cheaper, usually $20-30, but results vary wildly. Independent barbershops average $30-50. High-end establishments in trendy neighborhoods can hit $50-80.
Included services: Some shops include hot towel treatment, shoulder massage, product styling, and beverage in their base price. Others charge strictly for the cut.
Appointment vs walk-in: Shops with booking systems sometimes charge slightly more but guarantee time slots and often higher-quality service.
Getting the Best Value
Consistency over cheapness: A $35 cut that looks great beats a $20 cut that’s mediocre. Finding a skilled barber and sticking with them creates better long-term results than chasing deals.
Build a relationship: Regular clients often get priority scheduling, style memory, and sometimes better pricing. Barbers value customers who show up consistently.
Timing matters: Many shops offer weekday specials or off-peak discounts. Tuesday-Thursday mornings are typically slowest, sometimes discounted.
Tipping appropriately: Standard tip is 20% for good service. Your barber remembers consistent tippers and often provides better service over time.
Consider lifetime value: If you get cuts every 3 weeks, that’s roughly 17 cuts per year. The difference between $25 and $40 cuts is $255 annually. Is the quality improvement worth that to you? Only you can answer, but don’t undervalue skilled craftsmanship.
When to Pay More
- You have difficult hair (cowlicks, unusual growth patterns, very coarse or very fine texture)
- You want detailed design work or precise line art
- You’re in a professional field where appearance directly impacts income
- You’ve had bad experiences with budget options
- You value the experience (good conversation, relaxing environment, premium service)
When Budget Options Work
- You’re a student or have limited income
- You have simple, forgiving hair that cuts easily
- You’re maintaining a cut between appointments with a premium barber
- You’re in an area where even budget shops maintain decent standards
- You understand and accept the quality trade-off
FAQs About Low Taper Fade
How long does a low taper fade last before needing a touch-up?
A low taper fade stays sharp for about 2-3 weeks on average. By week two, most people notice visible regrowth, especially around the ears and neckline. If you want razor-sharp edges constantly, touch-ups every 10-14 days work best. If you can tolerate slight softening of the fade, stretch it to 3 weeks. Beyond that, you’re into grown-out territory.
Can I get a low taper fade with thin or thinning hair?
Yes. The low taper actually helps thin hair look fuller because it removes weight from the sides, creating the illusion of more volume on top. Keep the top section between 2-3 inches and add texture with product rather than leaving it flat. Avoid taking the fade too high, which can expose thinning areas on your crown. The low placement keeps attention on your hairline while the taper creates clean shape.
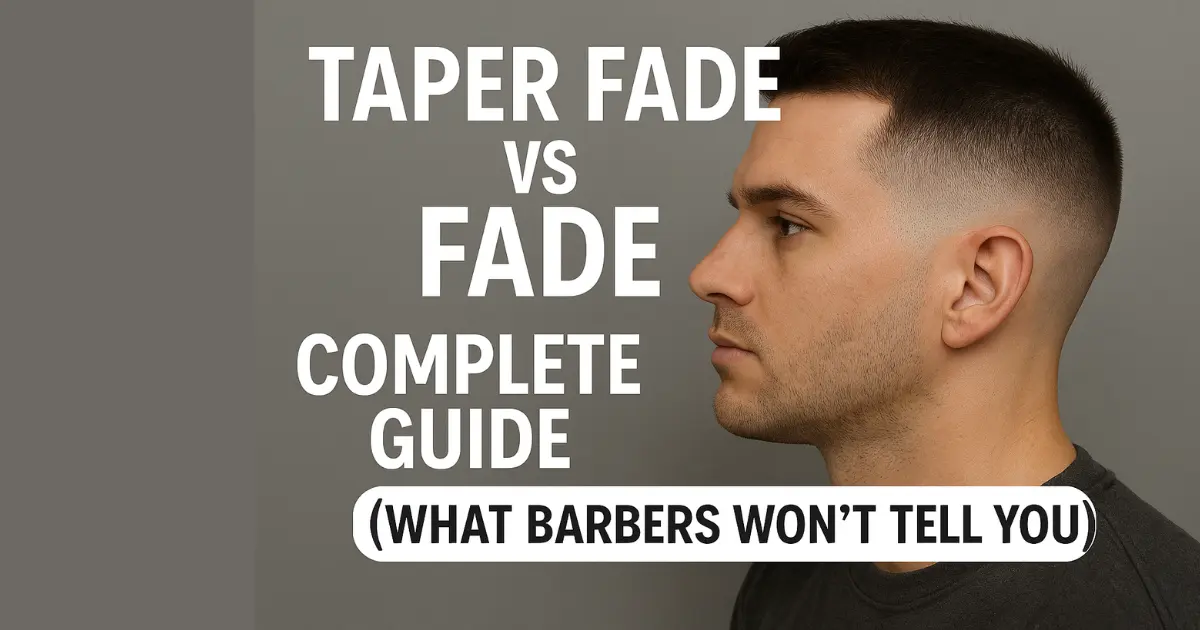
What's the difference between a low taper fade and a low fade?
Technical distinction: “Taper” describes gradually reducing length. “Fade” describes blending to skin or near-skin. A “low taper fade” combines both, starting low on your head and tapering down to very short or skin. In practice, many barbers use the terms interchangeably. If you want to be precise, a taper maintains slightly more length at the bottom while a fade takes it to skin level.
Is a low taper fade appropriate for professional/corporate jobs?
Absolutely. The low taper is one of the most workplace-friendly cuts available. It reads as clean, well-groomed, and intentional without being distracting or trendy. Keep your top length conservative (1-3 inches) and avoid bold designs or colors if you’re in a very traditional environment. Banks, law firms, tech companies, medical fields, and corporate offices all consider this style appropriate.
How much does a low taper fade typically cost?
Expect $25-40 in most US markets, with major metro areas reaching $40-60. Budget chains charge $20-25, premium independent shops hit $45-60, and high-end establishments can charge $60-80+. The cut itself takes the same time regardless of price, but you’re paying for skill level, consistency, shop experience, and attention to detail.
Can women get low taper fades?
Definitely. The low taper fade is gender-neutral technique gaining popularity with women who want short, clean cuts. It pairs beautifully with pixie cuts, undercuts, or any short style. Communicate clearly with your barber about desired fade height and top style. Bring reference photos if possible, as not all barbers have extensive experience cutting women’s fades.
What products work best for styling a low taper fade?
Depends on your hair type and desired look. Matte clay or paste for textured, natural finishes. Pomade for shine and hold. Curl cream for defining curls. Sea salt spray for waves and volume on fine hair. The fade itself needs minimal product, just keep your scalp clean and moisturized. Focus styling products on your top section.
How do I maintain a low taper fade at home between barber visits?
Wash every 2-3 days with gentle shampoo. Use light conditioner. Moisturize your scalp if you have naturally dry skin. For minor touch-ups, you can carefully trim the lowest part of your nape and sideburn tips with clippers using a #1 guard. Don’t attempt to recreate the fade blend itself. That requires professional skill. Wear a satin pillowcase if you have textured hair to maintain your top style overnight.
Will a low taper fade work with my curly/coily hair?
Yes, and it often looks even better than on straight hair. The low taper controls your outline and removes bulk around your ears and nape while letting your natural texture shine on top. The fade creates intentional shape that frames your curls beautifully. Communicate with your barber about moisture needs and maintenance. Curly and coily hair sometimes needs 2-4 weeks between cuts rather than 2-3.
What's the difference between a low taper and a mid taper?
Height placement. A low taper starts just above your ears, keeping the fade zone low and subtle. A mid taper begins around temple height, creating more visible contrast and climbing higher on your sides. Mid tapers make stronger statements but require more frequent maintenance since regrowth is more obvious. Choose low for subtle professionalism, mid for bolder style.
Can I do a low taper fade at home by myself?
Not recommended, especially for your first attempt. The back of your head is nearly impossible to see and cut evenly. The blend requires skill that takes years to develop. That said, if you’re determined and have good mirrors, adjustable clippers, and realistic expectations, you could attempt a basic version. Watch multiple tutorial videos first. Start conservative. Accept that your first several attempts will be learning experiences. Most guys conclude that paying a professional is worth it.
How do I prevent razor bumps and irritation from my low taper fade?
Multiple strategies help: Ask your barber not to go against the grain in irritation-prone areas. Request a slightly higher starting point to avoid the most sensitive skin near your hairline. Use an electric foil shaver instead of a straight razor for edge work. Apply witch hazel or alcohol-free aftershave immediately after your cut. Moisturize daily with unscented lotion or natural oils. Exfoliate gently 2-3 times per week to prevent ingrown hairs. If problems persist, consult a dermatologist about treatment options.